 Skip to content
 Flooring installation is one of the quickest methods to improve the appearance and price of your home. However, being a successful project is not something that begins on the day of installation but rather begins with appropriate preparation. Pre Frederick Prep Good flooring prep can enable installers to perform their work without taking as much time and without damaging your belongings and makes certain that your new floors work just the way they are expected to.
To achieve a smooth installation and durability in your results, then follow the entire checklist of the home owner.
Why should it be prepared more than most people who own homes believe
Poor materials do not bring many flooring issues. They have a bad preparation. Uneven subfloors, old furniture, water and poor accessibility also slow down the installation and decrease the lifetime of your floor.
Installing Professionally, it is expected to achieve:
- accurate leveling
- clean bonding surfaces
- correct expansion gaps
- retrospective steady performance.
Few plans during installation time save time, money and frustrations.
Clear the room completely
The initial step and the most essential to be taken is clearing of the space.
This includes:
- furniture
- rugs and mats
- decor items
- electronics
hangings or blinds which are low-hung.
The installers should have free access to every wall and corner. Even minor objects left systematically slow down the process and raise its chances of being damaged.
Proper flooring preparation will always start with a room that is empty.
Eliminate existing flooring (where needed)
There are those that are demolition in the installation, and then there are those where demolition is done prior to the installation of the new ones, as a condition of the project.
Old flooring may include:
- carpet and padding
- laminate planks
- vinyl tiles
- damaged wood boards
Assuming that your installer requests you to do removal, remember to:
- pull up all staples and nails
- remove adhesive residue
- dispose of waste properly
It is necessary to have clean and free surfaces of the floor in order to be able to do good floor preparation.
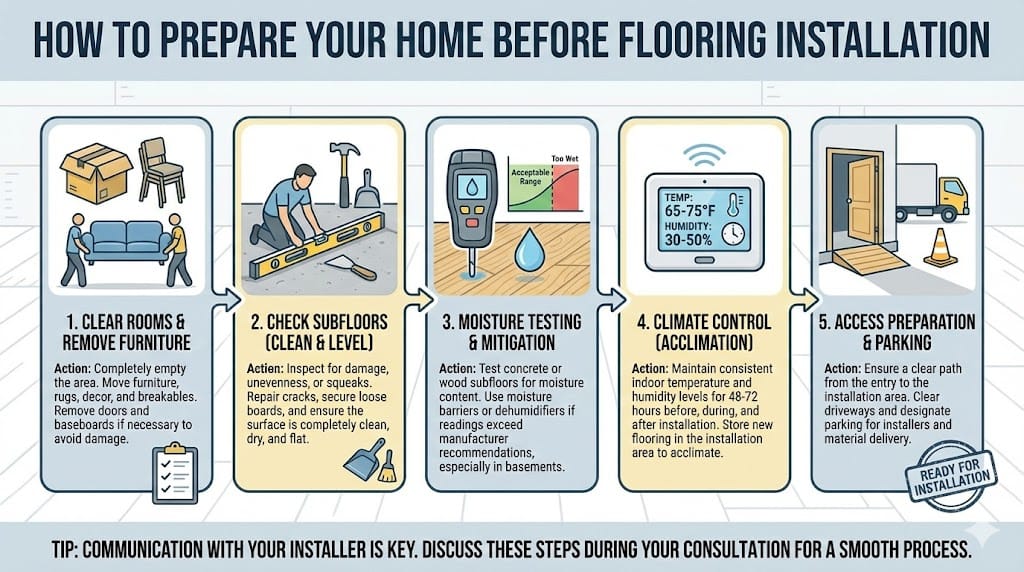
Inspect and fix subfloor
The floor you have been constructing is on your subfloor. No quality flooring would work, as the foundation on which it is laid on cannot withstand the weight.
Before installation:
- walk the entire room
- feel squeak or tender parts.
- look for uneven sections
- examine detectable cracks or gaps.
In case of loose panels or damaged parts, repair them before they are installed by the installers. Good subfloors offer improved bonding and improvement of movement when installed.
Moisture and humidity Scientific testing
Among the causes of failure of flooring, moisture takes the number one position.
Important checks include:
- damp concrete slabs
- previous water damage
- plumbing leaks nearby
- poor ventilation
In homes that have concrete subfloors or basements, the moisture testing is highly achievable. Most flooring items must have their moisture level within the manufacturer specifications in order to be installed.
This is a vital element of professional flooring preparation.
Ensure doors and access lines are open
Installers need heavy loads like a box of money, cutting tools, and huge planks. You should:
- open corridors and doors.
- eliminate wall decorations in tunnel areas.
- secure pets in another room
Access is easy, resulting in faster delivery and minimized risks of the accidental damage.
LFC-Texas is the best flooring option for premium floors and cabinets.
Control the temperature and climate before flooring installation
Flooring materials swell up and shrink depending on the temperature and humidity.
In order to be properly installed, it is necessary to:
- operate heating or cooling systems normally.
- do not subject to high and low temperatures.
- have a minimum of 48 hours of a stable indoor environment.
This enables materials to adjust itself to the climate of your house. One of the most ignored processes in proper flooring preparation is controlled climate.
Arrange the movement of appliances and cabinets
When flooring is being laid in kitchens, laundry rooms or bathrooms:
- establish whether installers would be moving appliances.
- legally disconnect water and gas lines.
- painted-out cabinets which can be used as an obstacle.
Do not assume the automatic transport of the appliances. Defining roles will prevent time wastage on the installation day.
Secure neighboring areas and surfaces
Even thorough installers produce dust and debris.
You should:
- cover nearby furniture
- sign in door with plastic sheets.
- guards wall ends and stair steps.
This minimizes the clean up after the installation and the rest of your house is made comfortable during the project.
Secure children and pets before flooring installation
Safety hazards are created by installation tools, nails, adhesives and cutting tools.
Arrange:
- a separate living space
- temporary pet care
- limited access to work zones
The responsible flooring prep of busy households includes safe work areas.
Initial check up prior to installers coming
Check the following night before:
- room fully empty
- subfloor clean and dry
- normal climatic functioning.
- walkways clear
- pets secured
Such small details aid installers to start without any delays.
Final thought
Preparation is not only as important as project materials that are used in the project, but also a key component of a successful flooring project. Removals, subfloor repair, moisture and constant indoor conditions can all contribute towards the impeccable installation. Installers are able to be more precise rather than having to solve a problem when the homeowner takes preparation seriously. Investing time in the correct preparation of the flooring is the least pragmatic method to save your new floors and have lovely displays in the forthcoming years.
